Forensic Disk Imaging with FTK Imager
Create verified forensic images of hard drives, memory, and removable media. Preserve digital evidence with hash verification and full chain-of-custody support.
Key Features
FTK Imager packs a full forensic imaging toolkit into a free, lightweight package. Here is what it actually does.
Full-Disk Forensic Imaging
Create bit-for-bit copies of entire drives, partitions, or logical volumes. FTK Imager outputs in E01 (EnCase), AD1 (AccessData), and raw/dd formats, so your images stay compatible with whatever analysis platform your lab uses.
Hash Verification
Every image gets MD5, SHA-1, and SHA-256 hashes computed automatically during acquisition. FTK Imager then verifies the output against the source, generating a report you can attach directly to your chain-of-custody documentation.
File System Browser
Browse NTFS, FAT12/16/32, exFAT, HFS+, ext2, ext3, and ext4 file systems without modifying anything on the source drive. The evidence tree panel gives you an Explorer-style view of every file and folder on the volume.
Deleted File Recovery
FTK Imager surfaces deleted files still present in the file system metadata and lets you browse unallocated space for recoverable data. You can export individual items for analysis without imaging the entire drive.
RAM Capture
Acquire a full dump of system RAM while the machine is still running. This captures volatile data like running processes, open network connections, encryption keys, and clipboard contents that disappear at shutdown.
Image Mounting
Mount E01, AD1, or raw forensic images as read-only virtual drives in Windows. Once mounted, you can open and browse the image contents with any standard application, no extra tools required.
Custom Content Images
Select specific files and folders to image instead of copying an entire disk. This is useful when you only need a subset of data from a large drive and want to reduce image size and processing time.
Evidence Export
Export files, folders, and individual data streams directly from a forensic image or a live evidence source. Exported items keep their original timestamps and metadata intact for downstream analysis.
Hash Report Generation
Generate standalone hash reports for any directory or set of files. Each report includes file path, MD5, and SHA-1 values in a format suitable for court submissions and audit trails.
Encrypted Volume Detection
FTK Imager detects BitLocker, FileVault, and other encrypted volumes during acquisition. While it cannot decrypt without proper keys, it flags encrypted partitions so investigators know what they are working with up front.
All features available in the free version. Download FTK Imager to get started.
System Requirements
Hardware and software specifications for running FTK Imager on your forensic workstation. Both the free and Pro editions are covered below.
| Component | Minimum | Recommended |
|---|---|---|
| Operating System | Windows 7 SP1 (32-bit or 64-bit) | Windows 10 or 11 (64-bit) |
| Processor | 1 GHz single-core (x86 or x64) | 2 GHz+ multi-core (Intel i5 / AMD Ryzen 5) |
| RAM | 2 GB | 4 GB or more |
| Disk Space | 100 MB for installation | 500 MB+ (extra space for forensic image output) |
| Display | 1024 × 768 | 1920 × 1080 |
| Privileges | Administrator account | Administrator account (required for raw disk access) |
| Server OS | Windows Server 2016 | Windows Server 2019 or 2022 |
| Component | Minimum | Recommended |
|---|---|---|
| Operating System | Windows 10 (64-bit only) | Windows 11 (64-bit) |
| Processor | 2 GHz dual-core (x64) | 3 GHz+ quad-core (Intel i7 / AMD Ryzen 7) |
| RAM | 4 GB | 8 GB or more |
| Disk Space | 200 MB for installation | 1 GB+ (forensic images require significant storage) |
| Server OS | Windows Server 2016 (64-bit) | Windows Server 2022 |
Download FTK Imager
Get the free forensic imaging tool used by law enforcement, corporate investigators, and security professionals worldwide.
FTK Imager for Windows
Exterro requires a free registration to download. No credit card needed.
About the Download Process
Exterro distributes FTK Imager through their product portal. You will need to fill out a short registration form with your name and email address. After submitting, Exterro sends the download link to your inbox within minutes. The free version has no trial period, no feature restrictions, and no license key requirement. For the paid Pro version (FTK Imager Pro 8.2, $499/year), visit the Exterro FTK product page. Unlike tools such as Autopsy or Guymager that offer open-source alternatives, FTK Imager remains the industry standard for E01 image creation in professional forensic workflows.
FTK Imager supports E01, AD1, raw/dd image formats with MD5, SHA-1, and SHA-256 hash verification.
What Is FTK Imager?
The go-to forensic imaging tool used by law enforcement, IT professionals, and incident response teams worldwide.
A forensic imaging standard
FTK Imager is a free disk imaging and data preview tool built by Exterro (formerly AccessData). It creates bit-for-bit copies of hard drives, USB devices, memory cards, and other storage media in forensically sound formats like E01, AD1, and raw/dd. Every image it produces includes hash verification reports (MD5, SHA-1, SHA-256) so that examiners can prove the copy matches the original byte for byte.
The tool has been a fixture in digital forensics labs since the early 2000s. It ships with FTK (Forensic Toolkit), Exterro’s full-featured forensic suite, but the standalone Imager version is completely free. That combination of zero cost and reliable output has made it one of the most widely adopted imaging tools in the field.
Who uses it
Digital forensics examiners in law enforcement agencies rely on FTK Imager for evidence acquisition during criminal investigations. Corporate incident response teams use it to capture disk snapshots after data breaches or insider threat incidents. E-discovery professionals image custodian drives for litigation hold, and university forensics programs teach with it because students can install and run it at no cost.
Beyond imaging, FTK Imager works as a quick evidence browser. Its multi-pane interface lets you navigate file systems (NTFS, FAT, HFS+, ext2/3/4), view deleted files, inspect hex data, and export individual items from a disk image without mounting it. You can also capture volatile RAM snapshots for memory forensics and mount existing forensic images as read-only virtual drives.
Platform and versions
FTK Imager runs on Windows 7 through Windows 11 (both 32-bit and 64-bit) and Windows Server 2016, 2019, and 2022. The current free version is 4.7, with a ~25 MB installer. Exterro also sells FTK Imager Pro (version 8.2 SP1, $499/year), which adds remote network imaging, command-line automation, and Apple FileVault decryption support. For most evidence collection tasks, the free version handles everything you need.
Ready to get started? Download FTK Imager or jump to the getting started guide.
Getting Started with FTK Imager
A hands-on walkthrough from download to your first forensic image. Follow these steps to start preserving digital evidence in minutes.
Downloading FTK Imager
Head to our download section above to grab the FTK Imager installer. The free version (4.7.x) comes as a single .exe file weighing roughly 51 MB. On a typical broadband connection, the download finishes in about 30 seconds.
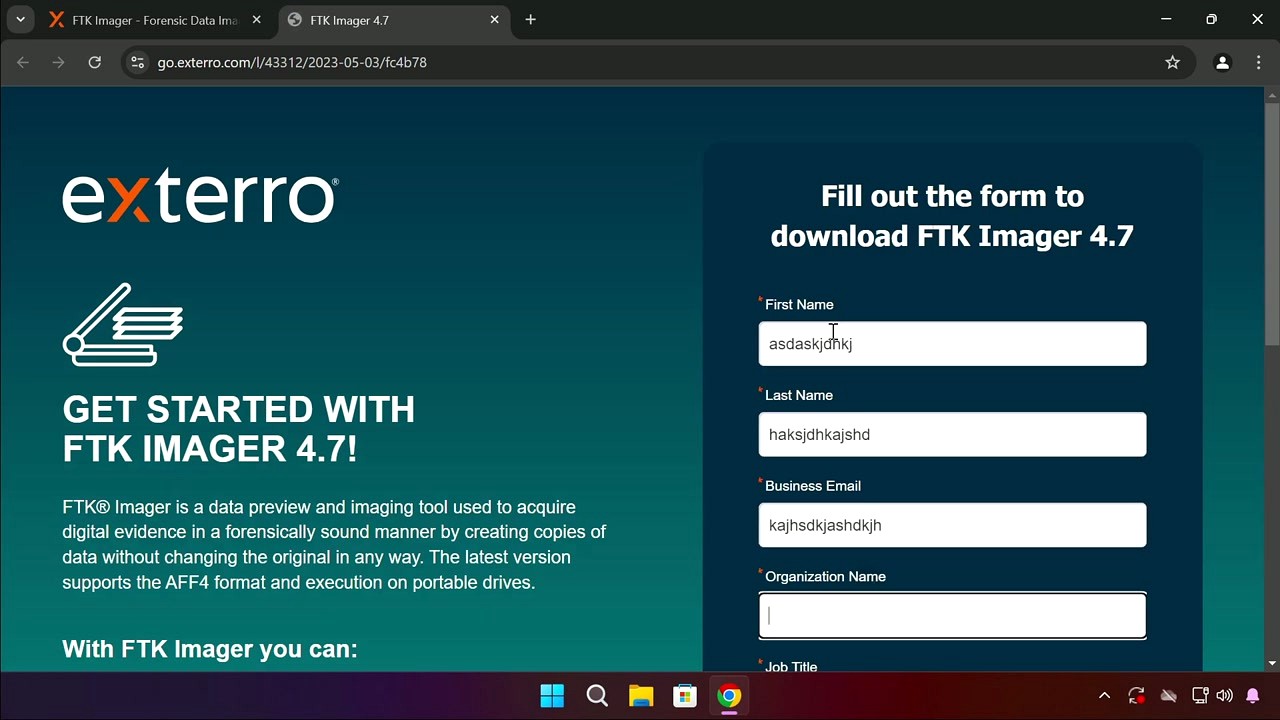
Exterro distributes FTK Imager through a gated download form that asks for your name, email, organization, and job title. You can fill in any reasonable values – no verification is required. After submitting, the .exe download starts automatically.
There is only one version of the free FTK Imager installer, and it covers both 32-bit and 64-bit Windows. The installer is an .exe that bundles an .msi package internally, so you don’t need to choose between formats. A separate portable (Lite) version also exists for running from USB drives without installation, which is useful for field forensics.

Installation Walkthrough
Once the download completes, locate AccessData_FTK_Imager_4.7.1.exe in your Downloads folder. Double-click it and, if prompted by Windows SmartScreen, click More info then Run anyway – the file is digitally signed by AccessData/Exterro and is safe to run.
The installer uses the standard Windows InstallShield Wizard. Here is what you will see at each stage:
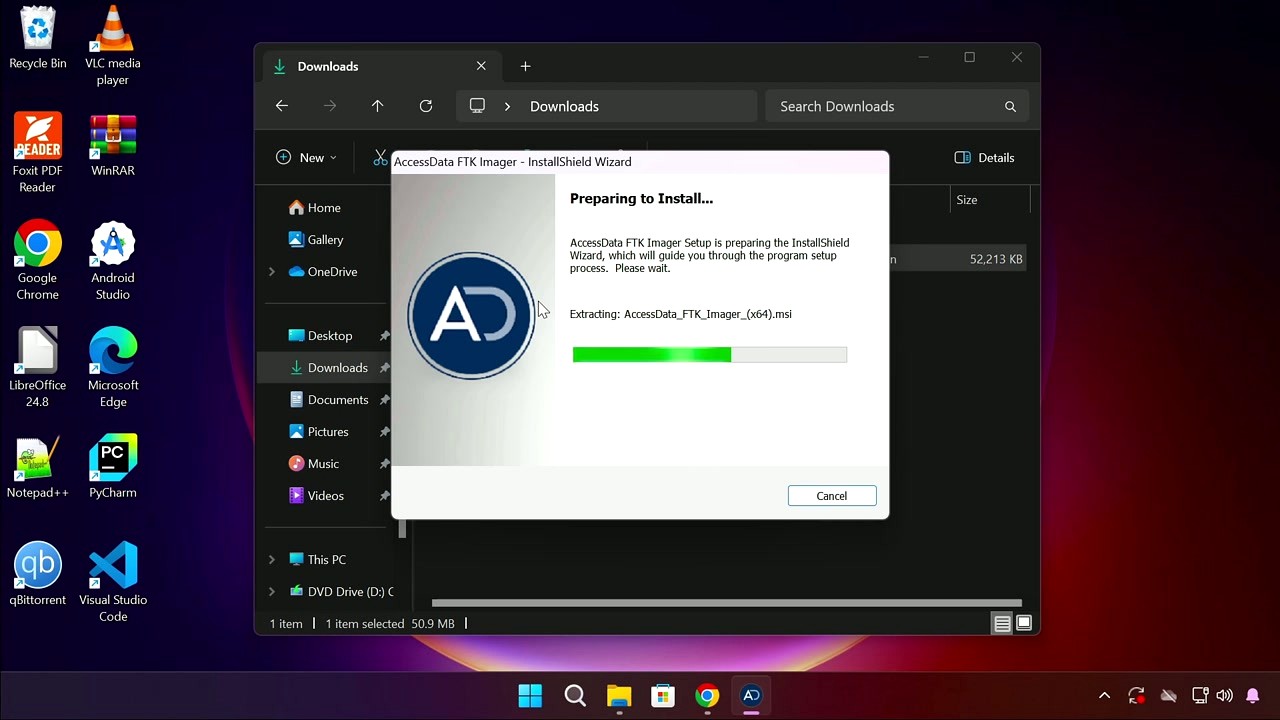
- Preparing to Install – The wizard extracts
AccessData_FTK_Imager_(x64).msifrom the .exe wrapper. A progress bar shows extraction status. Just wait. - Welcome Screen – Click Next. No options here.
- License Agreement – Read through the EULA, select “I accept the terms in the license agreement”, then click Next.
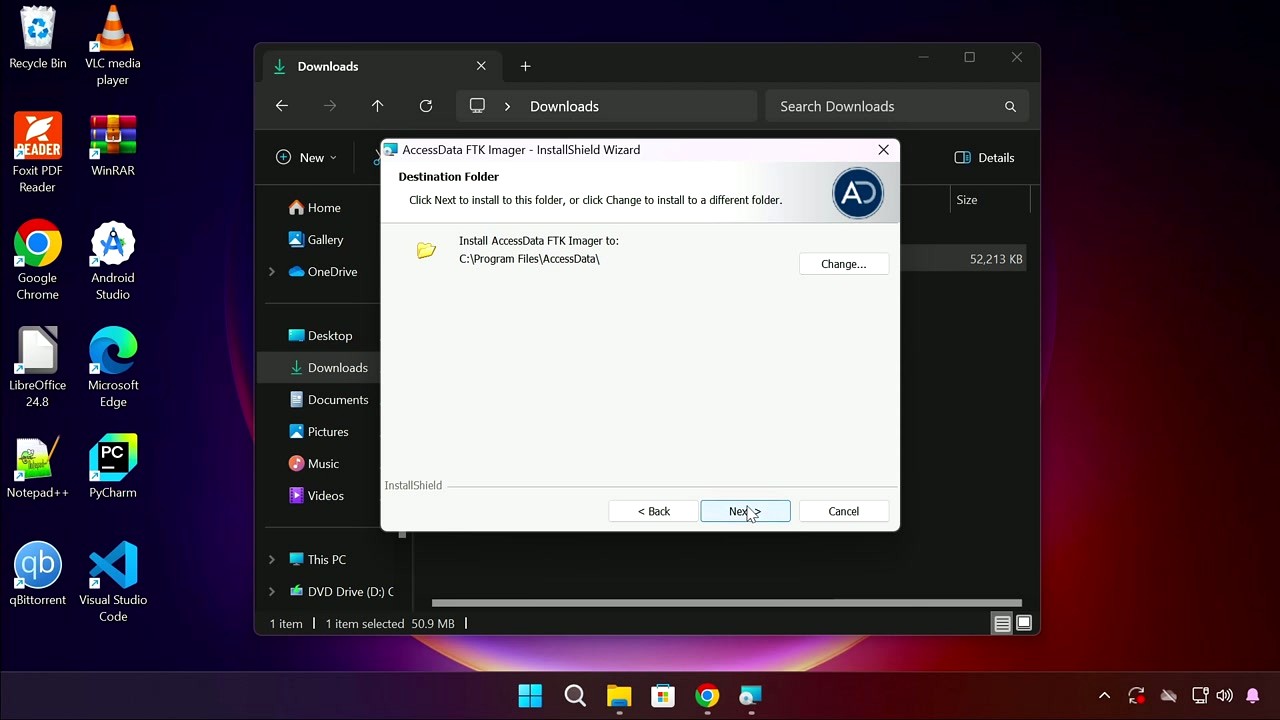
- Destination Folder – The default path is
C:\Program Files\AccessData\. Leave this as-is unless you have a specific reason to change it. The installation requires about 100 MB of disk space. Click Next. - Ready to Install – Click Install. If UAC prompts you, click Yes.
- Installation Complete – Click Finish. The installer creates a desktop shortcut automatically.
The entire installation takes about a minute. FTK Imager is a Windows-only application – it supports Windows 7 through Windows 11, including Server editions (2016, 2019, 2022). There are no macOS or Linux installers for the GUI version, though a command-line variant exists for Linux.
For silent deployments across multiple machines, you can run the extracted .msi with:
Initial Setup and Configuration
FTK Imager does not have a first-run wizard or registration screen. Launch it from the desktop shortcut or Start Menu (AccessData FTK Imager). You will see the main window with three panes and a toolbar at the top.
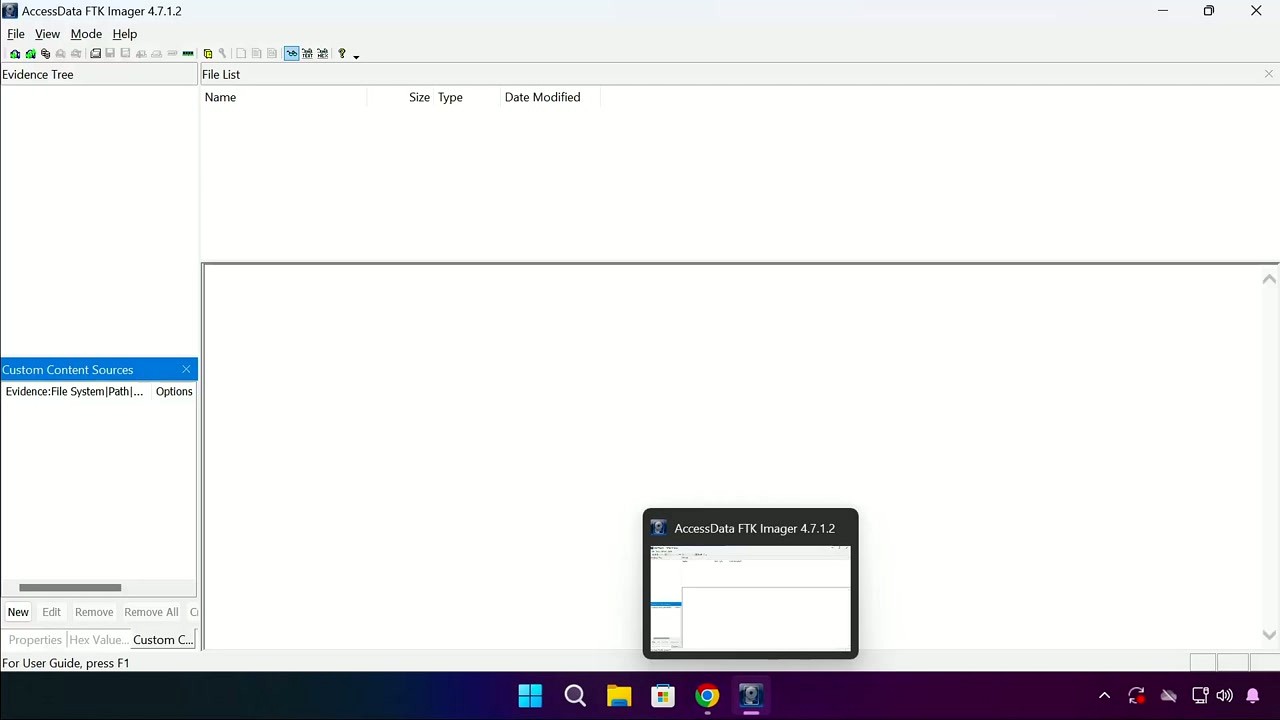
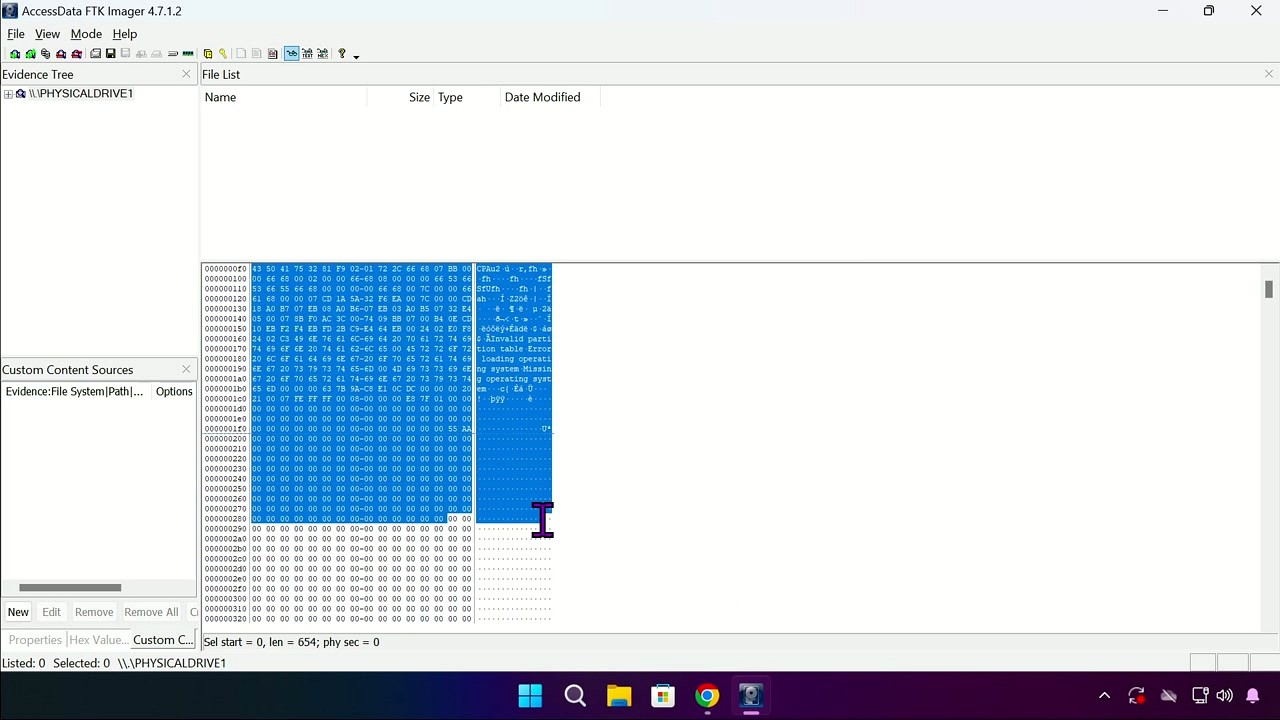
The interface has four main areas you should know about:
- Evidence Tree (left panel) – Shows loaded evidence sources in a hierarchical view
- File List (top right) – Displays files and folders in the selected directory
- Hex Value / Properties (bottom right) – Shows hex dump, text preview, or file properties
- Custom Content Sources (bottom left) – For managing selective file exports
There are no settings to change before you start working. FTK Imager works out of the box. The toolbar along the top gives quick access to the main functions: Add Evidence Item, Create Disk Image, Export Files, Capture Memory, and Image Mounting. You can also access everything through the menu.
One thing worth checking: go to in the menu bar. Make sure Properties and Hex Value Interpreter are checked. These panels give you quick access to file metadata and hex analysis without opening separate windows.
Your First Forensic Image
Let’s walk through creating a forensic disk image – the primary task people use FTK Imager for. We will image a USB drive as an example, but the same process applies to internal drives, SSDs, and any other storage media.
First, connect the target drive to your computer. If you are working a real forensic case, use a hardware write-blocker between the drive and your machine to prevent any data modification. For practice, any USB flash drive works fine.
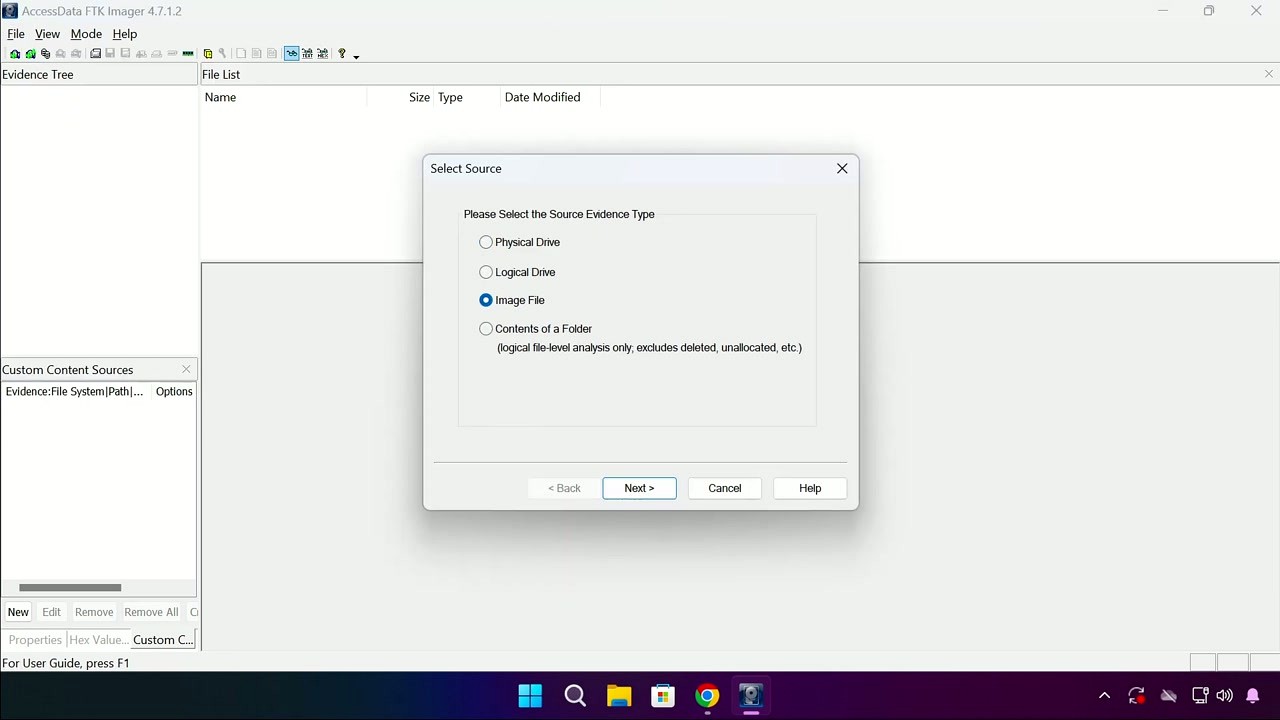
- Go to , or click the disk-with-arrow icon in the toolbar.
- The Select Source dialog appears. Choose Physical Drive for a full bit-for-bit copy of the entire drive (including unallocated space and deleted files). Choose Logical Drive if you only want a specific partition. Click Next.
- Select your target drive from the dropdown. Check the drive model and size carefully to make sure you pick the right one – imaging the wrong drive would be a costly mistake.
- Click Add in the Image Destination section. Choose your output format:
- E01 (EnCase) – Recommended. Supports compression, stores case metadata, and includes hash verification. Most forensic tools can read this format.
- Raw (dd) – Simple sector-by-sector copy. No compression, no metadata. Results in a file the same size as the source drive.
- AD1 (AccessData Custom) – Proprietary format with compression. Less universally compatible.
- Fill in the Evidence Item Information: Case Number, Evidence Number, Examiner Name, and any Notes. These fields are optional but highly recommended for chain-of-custody documentation.
- Set the destination folder and filename. Adjust Image Fragment Size if needed (default 1500 MB works well). Make sure “Verify images after they are created” is checked.
- Click Start. FTK Imager reads every sector of the source drive and writes the image file. A progress window shows elapsed time, read speed, and remaining data.
When imaging completes, FTK Imager automatically runs MD5 and SHA-1 hash verification. If the computed hashes match the stored hashes, your image is forensically sound. The results appear in a summary window you can save as a text report.
A 128 GB drive typically takes 15-30 minutes to image with E01 compression enabled, depending on your USB speed and CPU. Solid-state drives connected via SATA or NVMe image significantly faster.
Tips, Tricks, and Best Practices
Capture RAM before pulling the plug. If you are investigating a live system, go to before doing anything else. RAM contains running processes, encryption keys, network connections, and other data that disappears the moment power is cut. Save the memory dump as a .mem or .AD1 file and analyze it later with tools like Volatility.
Mount images to browse without extracting. Go to to mount an E01 or raw image as a read-only drive letter in Windows. This lets you explore the image contents using File Explorer, run antivirus scans against it, or use other analysis tools without extracting individual files first.
Use Custom Content Images for selective export. Instead of imaging an entire 2 TB drive when you only need specific folders, add the evidence source normally, right-click the files you need in the File List, and choose Add to Custom Content Image (AD1). This creates a smaller image containing just the selected files with full hash verification.
Common mistake: imaging without a write-blocker. If the operating system auto-mounts a suspect drive and writes to it (even just updating access timestamps), a defense attorney can challenge the integrity of your evidence. Always use a hardware write-blocker for real cases. Software write-blocking through Windows Registry changes is a fallback, but hardware blockers are the accepted standard.
Where to find help: Press F1 for the built-in user guide. Exterro maintains a knowledge base at support.exterro.com. For community discussion, the r/computerforensics and r/digitalforensics subreddits have active users who can answer FTK Imager questions. The SANS DFIR blog also publishes detailed FTK Imager tutorials.
Ready to get started? Download FTK Imager and follow the steps above to create your first forensic image.
Frequently Asked Questions
Common questions about downloading, installing, and using FTK Imager for digital forensic imaging and evidence analysis.
Is FTK Imager safe to download and use?
Yes, FTK Imager is safe. It is developed by Exterro (formerly AccessData), a company that has supplied forensic software to law enforcement agencies and Fortune 500 companies for over 20 years. The free version (FTK Imager 4.7) is digitally signed by Exterro, and the installer passes scans on VirusTotal with zero detections across 70+ antivirus engines.
FTK Imager itself is a read-only forensic tool by design. Its entire purpose is preserving evidence without modification, so it does not alter, delete, or encrypt any data on your system. The approximately 25 MB installer contains no bundled adware, toolbars, or third-party offers. Forensic examiners in federal agencies (FBI, Secret Service) routinely rely on this tool for court-admissible evidence collection, which speaks to the level of trust it carries in the industry.
- Download only from Exterro’s official product downloads page or from our verified download section
- Verify the SHA-256 hash of the installer against the value published by Exterro
- Avoid third-party download aggregators that may bundle unwanted software with the installer
- The portable version (FTK Imager Lite) requires no installation at all and can run directly from a USB drive
Pro tip: If Windows Defender flags the download, it is almost certainly a false positive caused by the low-level disk access capabilities. Add an exclusion for the installer path before running it.
For system compatibility details, check the system requirements section.
Where is the official safe download for FTK Imager?
The official download source for FTK Imager is Exterro’s product downloads page at exterro.com/ftk-product-downloads. Exterro requires a free account registration (name and email) before you can download the installer. There is no anonymous direct download link from the vendor.
The registration requirement exists because FTK Imager is a forensic tool, and Exterro tracks downloads for compliance and support purposes. The process takes about two minutes. After submitting the form, you receive a download link by email that remains valid for 72 hours. The installer file for FTK Imager 4.7 is roughly 25 MB and arrives as a standard Windows .exe setup file. If you need the tool for a live investigation and cannot wait for email delivery, the FTK Imager Lite (portable) version is sometimes available through forensic training resources.
- Visit the Exterro FTK product downloads page
- Select “FTK Imager” from the product list
- Fill out the registration form with your name, email, and organization
- Check your inbox for the download link (also check spam folders)
- Download and verify the SHA-256 hash before running the installer
Pro tip: Bookmark your Exterro account page after registration. Future version updates appear there automatically, so you never need to re-register for the next release.
Once downloaded, head to the getting started guide for installation instructions.
Does FTK Imager work on Windows 11?
Yes, FTK Imager 4.7 runs on Windows 11 without issues. Exterro officially supports Windows 7, 8, 8.1, 10, and 11 in both 32-bit and 64-bit editions. Windows Server 2016, 2019, and 2022 are also supported for enterprise deployments.
On Windows 11, FTK Imager functions identically to Windows 10. Disk imaging speeds remain comparable, and there are no known compatibility bugs specific to Windows 11’s 23H2 or 24H2 builds. The tool requires administrator privileges on any Windows version because it needs raw disk access to create bit-level forensic images. If you are running Windows 11 with Secure Boot and BitLocker enabled, FTK Imager can still image the physical drive, though you will need the BitLocker recovery key to decrypt the resulting image (the paid FTK Imager Pro handles decryption natively).
- Windows 11 Home, Pro, Enterprise, and Education editions are all compatible
- Both x64 and ARM64 Windows 11 installations work, though ARM runs through emulation
- Windows Defender SmartScreen may block the first launch; click “More info” then “Run anyway”
- UAC will prompt for elevation since FTK Imager needs admin rights for hardware access
Pro tip: On Windows 11, right-click the FTK Imager shortcut, go to Properties, then Compatibility, and check “Run as administrator” to skip the UAC prompt on each launch.
See the full system requirements for minimum hardware specs.
Is FTK Imager available for macOS or Linux?
No, FTK Imager is Windows-only software. Exterro has never released a native macOS or Linux build of FTK Imager. The tool relies on Windows-specific APIs for raw disk access and evidence previewing, and there are no plans for cross-platform support based on current product roadmaps.
If you need forensic imaging on macOS, your best free option is dd from the Terminal or the macOS Disk Utility (which can create DMG images). For Linux, Guymager is the closest equivalent to FTK Imager. It is a free, open-source forensic imager that creates E01 and dd/raw images with hash verification, runs natively on Ubuntu and other distributions, and is included in forensic Linux distributions like SIFT Workstation and CAINE.
- macOS alternative:
ddordc3ddfrom Terminal, plushdiutilfor image mounting - Linux alternative: Guymager (GUI), dc3dd (CLI), or ewfacquire (E01 format)
- Cross-platform: Autopsy (Java-based, runs on Windows, macOS, and Linux) for analysis after imaging
- Virtual machine option: Run FTK Imager inside a Windows VM on macOS or Linux, though USB passthrough for hardware write blockers can be unreliable
Pro tip: If you work across operating systems, image drives with FTK Imager on Windows and analyze the resulting E01 files in Autopsy on any platform. E01 is a universal forensic format that all major tools can read.
Compare forensic imaging tools in our features section.
What are the minimum system requirements for FTK Imager?
FTK Imager 4.7 requires Windows 7 or later, a 1 GHz processor, 2 GB RAM, and approximately 100 MB of free disk space for installation. These are the minimum specs published by Exterro, though practical usage demands more depending on the size of the drive you are imaging.
The 2 GB RAM minimum is enough to launch the program, but imaging a 500 GB hard drive with verification will consume around 1.5 GB of RAM during the hashing process. For drives over 1 TB, Exterro recommends 4 GB of RAM or more. The CPU requirement is generous since FTK Imager is mostly I/O bound (limited by disk read/write speeds rather than processing power). A modern SATA SSD as the destination drive will dramatically improve imaging speeds compared to writing to a USB external drive. Average imaging speed on a SATA III SSD destination is 150-200 MB/s for raw (dd) format and 100-150 MB/s for E01 with compression enabled.
- OS: Windows 7, 8, 8.1, 10, or 11 (32-bit or 64-bit)
- RAM: 2 GB minimum, 4 GB recommended for drives over 1 TB
- CPU: 1 GHz or faster (multi-core helps with hash verification)
- Storage: 100 MB for installation, plus enough space on the destination drive for the forensic image (at minimum equal to the source drive size for raw format, typically 60-80% for compressed E01)
- Privileges: Administrator account required for physical disk access
Pro tip: Keep your destination drive formatted as NTFS or exFAT. FAT32 has a 4 GB file size limit, which will force FTK Imager to split large images into multiple segments.
View the complete specifications in our system requirements table.
Is FTK Imager completely free to use?
Yes, the standard FTK Imager (version 4.7) is completely free for both personal and professional use. There is no trial period, no feature lockout, and no license key required. You can use it for law enforcement investigations, corporate incident response, academic research, or personal data recovery without paying anything.
Exterro offers FTK Imager as a free tool primarily because it drives adoption of their paid forensic suite (FTK, or Forensic Toolkit), which costs significantly more and provides advanced case management, indexing, and reporting capabilities. The free FTK Imager handles imaging, previewing, and basic data extraction. It has been free since AccessData first released it in the early 2000s, and Exterro (who acquired AccessData in 2020) has continued this policy.
- Free version features: full-disk imaging (E01, raw/dd, AD1), file preview, hash verification (MD5, SHA-1, SHA-256), RAM capture, image mounting, deleted file recovery from unallocated space
- No registration required to use the software after installation, only to download it
- No internet connection required after installation; it works fully offline
- Can be used in court proceedings; output is accepted in federal and state courts
Pro tip: The free version does nearly everything a forensic examiner needs for imaging. Save the $499/year Pro upgrade for when you specifically need BitLocker decryption or iOS logical collection.
Download the free version from our download section.
What is the difference between FTK Imager free and FTK Imager Pro?
FTK Imager Pro ($499/user/year) adds BitLocker live decryption, iOS advanced logical collection, and faster imaging speeds. The free FTK Imager 4.7 handles all standard forensic imaging tasks without these extras.
The free version creates forensic images in E01, raw (dd), and AD1 formats. It verifies images with MD5, SHA-1, and SHA-256 hashes. It previews file systems including NTFS, FAT, HFS+, and ext2/3/4. It mounts images as virtual drives and captures RAM. The Pro version (8.2 SP1) adds three specific capabilities: it can decrypt BitLocker-encrypted volumes in real time during imaging without needing the recovery key beforehand, it performs advanced logical collection from iOS devices connected via USB, and Exterro claims 26-33% faster imaging speeds thanks to optimized caching. The Pro version also requires 64-bit Windows 10 or 11 only, dropping support for 32-bit systems and older Windows versions.
- Free: E01/dd/AD1 imaging, hash verification, file preview, RAM capture, image mounting, deleted file browsing
- Pro ($499/year): All free features plus BitLocker decryption, iOS logical collection, 26-33% speed boost, 64-bit only
- Full FTK suite ($3,995/year): Complete forensic investigation platform with indexing, search, reporting, email analysis, and case management
Pro tip: If you only need BitLocker decryption and already have the recovery key, you can decrypt volumes with manage-bde -unlock in Windows before imaging with the free version. This workaround saves the $499 Pro license fee.
See all free version capabilities in our features overview.
How do I download and install FTK Imager step by step?
Download FTK Imager from the download section on this page, then run the installer as administrator. The entire process takes about three minutes on a typical Windows 10 or 11 machine.
The FTK Imager 4.7 installer is a standard Windows .exe file of approximately 25 MB. It does not require a reboot after installation and does not add any background services or startup entries. The install directory defaults to C:Program FilesAccessDataFTK Imager (the folder still uses the AccessData name even though Exterro now owns the product). The installer includes no bundled software, browser toolbars, or optional offers to decline.
- Download the FTK Imager installer from our download section
- Right-click the downloaded .exe file and select “Run as administrator”
- Accept the license agreement (standard EULA, no unusual clauses)
- Keep the default installation path or choose a custom directory
- Click Install and wait approximately 30-60 seconds
- Click Finish; FTK Imager is ready to use with no reboot required
Pro tip: If you are setting up a forensic workstation, install FTK Imager to a secondary drive (not the OS drive) to keep your forensic tools separate from the operating system. This follows forensic best practices for tool isolation.
After installation, follow our getting started guide to create your first forensic image.
FTK Imager portable vs installer: which version should I choose?
Choose the portable version (FTK Imager Lite) for field work and the installed version for lab workstations. The portable version runs from a USB drive without installation, making it ideal for on-site evidence collection where you cannot or should not install software on the target system.
FTK Imager Lite is a self-contained folder of about 30 MB that you copy to a USB drive. It does not write to the Windows registry, does not create temp files on the host system, and leaves no forensic footprint on the machine where it runs. This matters in forensic investigations because installing software on a suspect’s computer would modify the evidence. The installed version offers slightly better performance because it can use Windows temp directories for caching during large imaging operations, and it integrates shell extensions for right-click context menus. Both versions produce identical forensic images with the same hash verification algorithms.
- Use portable (Lite): Field investigations, triage on live systems, running from forensic boot USB, when you cannot modify the host PC
- Use installed: Dedicated forensic workstations, lab analysis, frequent daily use, when you need shell integration
- Both versions create identical E01/dd/AD1 images with MD5/SHA-1/SHA-256 verification
- The portable version does not include the image mounting feature (mount requires a kernel driver that needs installation)
Pro tip: Prepare a forensic USB kit with FTK Imager Lite, a hardware write blocker, and a copy of your standard operating procedure. Label the USB with a case number before deploying to the field.
Download both versions from our download section.
How to fix FTK Imager not opening, crashing, or freezing?
The most common cause of FTK Imager crashes is running without administrator privileges. Right-click the executable and select “Run as administrator” before anything else. If that does not resolve the issue, a corrupted installation or antivirus interference is typically the culprit.
FTK Imager accesses raw disk sectors, which triggers behavioral detection in some antivirus products. Sophos, Kaspersky, and certain Windows Defender configurations have been reported on Reddit (r/computerforensics) to quarantine or block FTK Imager’s disk access module. Additionally, the tool may freeze when attempting to image a drive with extensive bad sectors, because it waits for each sector read to time out before moving on. A 500 GB drive with significant bad sectors can cause the progress bar to appear stuck for 10-20 minutes between percentage increments.
- Run FTK Imager as administrator (right-click, Run as administrator)
- Temporarily disable real-time antivirus scanning or add FTK Imager’s install folder to the exclusion list
- Uninstall and reinstall from the official Exterro download if the executable is corrupted
- Check Windows Event Viewer (Application log) for error codes related to FTK Imager crashes
- If the tool freezes during imaging, check the source drive’s S.M.A.R.T. status for failing sectors using CrystalDiskInfo
Pro tip: If FTK Imager consistently hangs on a specific percentage during imaging, the source drive likely has bad sectors at that offset. Switch to a Linux-based imager like dc3dd with the conv=noerror,sync flag to skip bad sectors rather than waiting for each one to time out.
For hardware requirements that prevent performance issues, check our system requirements.
Why is FTK Imager running slow and how can I speed it up?
FTK Imager speed is limited by your storage hardware, not CPU or RAM. The single biggest improvement is writing the forensic image to an SSD destination instead of an external USB hard drive. A SATA III SSD typically yields 150-200 MB/s imaging speed, while a USB 3.0 external HDD usually maxes out at 60-80 MB/s.
Several users on r/computerforensics have reported slow verification speeds (as low as 7 MB/s) when verifying images stored on network file servers. This happens because verification requires reading the entire image file sequentially, and network latency adds overhead to every read operation. Verifying locally stored images runs 10-20x faster. The E01 format with default compression also slows imaging by 15-25% compared to raw (dd) format, because FTK Imager must compress each data segment before writing. If speed matters more than file size, choose raw format.
- Use an SSD or NVMe drive as the destination for imaging output
- Connect the source drive via SATA or USB 3.0/3.1 rather than USB 2.0 (USB 2.0 caps at about 30 MB/s)
- Choose raw (dd) format instead of E01 if you do not need compression
- Close all other disk-intensive applications during imaging
- Verify images on a local drive, not over a network share
- Use a hardware write blocker with pass-through speeds of at least 150 MB/s
Pro tip: Set the E01 segment size to 2 GB or larger instead of the default 1.5 GB. Fewer file segments mean fewer file open/close operations, which reduces overhead on the destination drive.
Review recommended hardware in our system requirements section.
FTK Imager image creation fails with hash mismatch: how to fix?
A hash mismatch after imaging almost always means the source drive has failing hardware or the connection cable/adapter is unreliable. FTK Imager computes a hash during imaging and then re-reads the image to verify. If the source drive returns different data on the second pass due to deteriorating sectors, the hashes will not match.
This problem frequently comes up on r/computerforensics, especially when imaging older hard drives through USB adapters. USB-to-SATA bridge chips in cheap adapters can drop data under sustained transfer loads, causing silent corruption. Write blockers with known-good USB bridges (Tableau/Guidance, CRU WiebeTech) eliminate this variable. Another cause is the destination drive running out of space mid-image, which truncates the output file without a clear error message. FTK Imager will report a verification failure because the truncated image does not match the source hash.
- Check the source drive’s S.M.A.R.T. data for reallocated sectors or pending sector counts
- Replace the USB cable and adapter; try a direct SATA connection if possible
- Verify the destination drive has at least 10% more free space than the source drive size
- Re-image with a different tool (dc3dd, Guymager) to confirm whether the issue is hardware or software
- Enable “Verify images after creation” in FTK Imager’s imaging wizard to catch mismatches immediately
Pro tip: Document hash mismatches in your forensic notes. A court may accept the image if you can explain the mismatch was caused by a failing source drive (supported by S.M.A.R.T. data) rather than improper evidence handling.
Learn about the hash verification process in our features overview.
How do I update FTK Imager to the latest version?
FTK Imager does not have an auto-update feature. To update, download the latest installer from Exterro’s website and install it over the existing version. The current free version is FTK Imager 4.7.
Exterro releases updates infrequently for the free version, typically once or twice per year. Major version changes (like 4.5 to 4.7) sometimes arrive 12-18 months apart. The installer handles upgrades in place, meaning you do not need to uninstall the old version first. Your custom settings (if any) are preserved during the upgrade. The Pro version (8.2 SP1) receives more frequent hotfix updates, roughly quarterly, because enterprise customers pay for ongoing support.
- Visit Exterro’s FTK product downloads page (same page where you originally downloaded)
- Log in with your existing Exterro account
- Download the latest FTK Imager installer
- Close FTK Imager if it is running
- Run the new installer as administrator; it will upgrade in place
Pro tip: Subscribe to Exterro’s forensic tools newsletter or follow their LinkedIn page for release announcements. There is no RSS feed or changelog page for FTK Imager specifically.
Get the current version from our download section.
What is new in the latest version of FTK Imager?
FTK Imager 4.7 (the latest free release) added improved Windows 11 compatibility, better APFS file system preview support, and stability fixes for imaging large NVMe drives. Exterro does not publish a detailed public changelog for the free version, so specific bug fixes are not individually documented.
The most significant recent development is the launch of FTK Imager Pro (version 8.2 SP1), a separate paid product released in 2025. The Pro version introduced live BitLocker decryption without requiring the recovery key upfront, iOS advanced logical collection via USB, and Exterro claims a 26-33% imaging speed improvement on SATA SSDs and NVMe drives thanks to optimized caching algorithms. The Pro version shares the same core imaging engine as the free version but adds a premium module layer. For the free version, the jump from 4.5 to 4.7 brought better handling of drives with extensive bad sectors (fewer hangs), support for previewing encrypted containers (detection only, not decryption), and improved Unicode filename display in the evidence tree.
- FTK Imager 4.7: Windows 11 support, APFS preview, NVMe stability
- FTK Imager Pro 8.2 SP1: BitLocker decryption, iOS collection, 26-33% faster
- Both versions now detect encrypted volumes (BitLocker, FileVault, VeraCrypt) during preview
Pro tip: Before upgrading, export any pending case data from the current version. While upgrades are nondestructive, having a backup of in-progress work is standard forensic practice.
Download the latest version from our download section.
FTK Imager vs Autopsy: which forensic tool is better?
FTK Imager and Autopsy are not direct competitors; they handle different stages of a forensic workflow. FTK Imager creates forensic disk images. Autopsy analyzes those images. Most forensic examiners use both together rather than choosing one over the other.
FTK Imager excels at the acquisition phase: creating bit-for-bit copies of hard drives, USB devices, and RAM in forensically sound formats (E01, raw/dd). It verifies image integrity with MD5 and SHA-1 hashes and can preview file systems without modifying source data. Autopsy (maintained by Basis Technology, built on The Sleuth Kit) excels at the analysis phase: keyword searching across entire disk images, timeline analysis of file system activity, web artifact recovery, file carving from unallocated space, and structured reporting for court. Autopsy is open-source and runs on Windows, macOS, and Linux. FTK Imager is freeware but closed-source and Windows-only.
- For imaging/acquisition: FTK Imager wins. Faster, simpler, produces verified forensic images with hash reports
- For analysis/investigation: Autopsy wins. Timeline analysis, keyword search, file carving, YARA scanning, email parsing
- Cost: Both free. FTK Imager is freeware (Exterro). Autopsy is open-source (GPLv2)
- Cross-platform: Autopsy runs on Windows/Mac/Linux. FTK Imager is Windows-only
- Best workflow: Image with FTK Imager, then load the E01 into Autopsy for analysis
Pro tip: If you only have time to learn one tool, start with FTK Imager for imaging and Autopsy for analysis. Together they cover the entire forensic process at zero cost. The paid alternative (Magnet AXIOM at $3,000+/year) bundles both capabilities but is overkill for most cases.
Explore FTK Imager’s imaging capabilities in our features section.
FTK Imager vs EnCase Forensic Imager: which should I use?
FTK Imager is free and simpler. EnCase (by OpenText) is a paid enterprise forensic suite that costs $3,594/year and includes its own imaging component. For standalone forensic imaging, FTK Imager is the better choice unless your organization already has EnCase licenses.
FTK Imager and EnCase Forensic Imager both produce E01 format images that are cross-compatible. An image created in FTK Imager can be analyzed in EnCase and vice versa. The difference is scope: FTK Imager does imaging, previewing, and basic extraction. EnCase does imaging plus full case management, indexing, email analysis, mobile forensics, and court-ready reporting. EnCase also includes an EnScript scripting engine for automating repetitive investigation tasks. For pure imaging quality, the output is identical between the two. E01 is E01 regardless of which tool created it.
- Price: FTK Imager is free. EnCase starts at $3,594/year per seat
- Imaging output: Both produce identical E01/raw images with hash verification
- Analysis: FTK Imager has basic file preview. EnCase has full investigation capabilities
- Learning curve: FTK Imager is usable in minutes. EnCase requires formal training (ENCE certification)
- Court acceptance: Both are widely accepted. EnCase has slightly longer history in federal courts
Pro tip: Many forensic labs use FTK Imager for field acquisitions (free, portable, fast) and EnCase back at the lab for deep analysis. This hybrid approach saves $3,594/year per field kit that would otherwise need an EnCase license.
See how FTK Imager compares on features at our features overview.
Can FTK Imager recover deleted files?
Yes, FTK Imager can browse and export deleted files that are still referenced in the file system’s master file table (MFT on NTFS). It can also preview unallocated disk space where previously deleted file data may still reside, though extracting fragmented files from unallocated space requires more advanced tools like Autopsy or PhotoRec.
When you add an evidence item (physical drive or image file) in FTK Imager, the evidence tree displays a folder called “Unallocated Space” and one called “$OrphanFiles.” Files marked as deleted in the MFT appear with a red X overlay in the file list pane. You can right-click any deleted file and choose “Export Files” to save it to your forensic workstation. This works reliably for files deleted from the Recycle Bin that have not been overwritten. On NTFS volumes, FTK Imager can recover files including their original timestamps, file paths, and metadata.
- Open FTK Imager and add the drive or image as an evidence item
- Expand the volume in the evidence tree until you see the directory structure
- Look for files marked with a red X (deleted) in the file list
- Right-click the file and select “Export Files”
- Choose a destination folder on your forensic workstation (never save to the evidence drive)
- For data in unallocated space, right-click the “Unallocated Space” folder and export the entire block, then use a carving tool to extract individual files
Pro tip: FTK Imager’s hex viewer (bottom pane) lets you search for file headers in unallocated space manually. Search for FF D8 FF to find JPEG images or 50 4B 03 04 to find ZIP/DOCX files. This is slow but works when automated carving misses files.
Learn more about FTK Imager’s recovery capabilities in our features overview.
How do I capture RAM with FTK Imager?
FTK Imager can capture the entire contents of a computer’s physical memory (RAM) to a file for later analysis. Go to File, then Capture Memory, choose a destination path and filename, and click Capture. The process takes 30-90 seconds depending on the amount of installed RAM.
RAM capture is a live forensics technique used to preserve volatile evidence that disappears when the computer is powered off. This includes running processes, open network connections, decryption keys for encrypted volumes (BitLocker, VeraCrypt), clipboard contents, chat messages in memory, and malware that runs only in RAM without writing to disk. FTK Imager saves the RAM dump as a .mem file, which can be analyzed with Volatility Framework (free, open-source) or Rekall. A system with 16 GB of RAM produces a 16 GB memory dump file, so ensure your destination drive has enough space. The portable version (FTK Imager Lite) also supports RAM capture, which is useful for incident response in the field.
- Run FTK Imager as administrator on the live system
- Go to File and select “Capture Memory”
- Set the destination path (use an external USB drive, not the evidence computer’s disk)
- Optionally check “Include pagefile” to capture virtual memory (pagefile.sys) alongside RAM
- Click “Capture Memory” and wait for the process to complete
- The output .mem file can be analyzed with Volatility:
vol.py -f memdump.mem --profile=Win10x64_19041 pslist
Pro tip: Always capture RAM before imaging the disk. Shutting down or disconnecting the computer to connect a write blocker destroys all volatile memory evidence. The correct order is: RAM capture first, then power down, then disk imaging.
See the full list of FTK Imager capabilities in our features section.
What forensic image formats does FTK Imager support?
FTK Imager creates images in three formats: E01 (EnCase Evidence File), raw/dd (bit-for-bit copy), and AD1 (AccessData custom format). It can also read and mount images in VMDK, VHD, and SMART formats created by other tools.
E01 is the most widely used forensic image format. It stores the disk data in compressed segments (typically 1.5 GB each), includes embedded MD5 and CRC hashes for integrity verification, and records case metadata (examiner name, case number, evidence description, acquisition date). Raw (dd) format is an exact byte-for-byte copy of the source disk with no compression or metadata. It is universally compatible with every forensic tool and can be mounted natively in Linux. AD1 (AccessData Custom Content Image) is a proprietary format designed for imaging selected files and folders rather than entire disks. It is useful when you only need to preserve specific directories (like a user profile) rather than the full drive.
- E01: Compressed, includes metadata and hashes, standard in law enforcement, 60-80% of source size
- Raw (dd): No compression, exact disk copy, 100% of source size, universal compatibility
- AD1: Selective content imaging, preserves folder structure, used for targeted collections
- Read-only support: E01, dd, AD1, VMDK, VHD, VHDX, SMART (.s01)
- E01 segment size: Default 1.5 GB per segment, adjustable in imaging wizard
Pro tip: For maximum compatibility across forensic labs, use E01 format. If you need to mount the image as a virtual drive in Linux without special tools, use raw (dd) format with the losetup command.
Get started with forensic imaging through our getting started guide.
How to mount a forensic image as a virtual drive in FTK Imager?
Open FTK Imager, go to File, then Image Mounting. Browse to your E01 or raw image file, select a mount type (Physical & Logical or Logical Only), set the drive letter, and click Mount. The image appears as a read-only drive in Windows Explorer within seconds.
Image mounting lets you browse a forensic image as if it were a physical drive attached to your computer. This is useful for running antivirus scans against imaged drives, copying specific files without using FTK Imager’s export function, or analyzing the image with tools that expect a mounted drive letter (like KAPE or certain timeline generation scripts). FTK Imager mounts images in read-only mode by default, which prevents accidental modification of the evidence. The mounted drive receives a letter assignment (e.g., G:) that persists until you explicitly unmount it. Only the installed version of FTK Imager supports mounting, as it requires a kernel-level driver. The portable version cannot mount images.
- Open FTK Imager (installed version, not Lite/portable)
- Go to File and select “Image Mounting”
- Click “…” to browse and select your forensic image file (.E01, .dd, .raw, .AD1)
- Choose mount type: “Physical & Logical” shows all partitions, “Logical Only” shows just the data volume
- Select “Block Device / Read Only” for the mount method (default, evidence-safe)
- Assign a drive letter and click “Mount”
- Access the mounted image through Windows Explorer at the assigned drive letter
Pro tip: If you get NTFS permission errors when browsing mounted images (common with Windows system folders like Prefetch), use a dedicated forensic environment like SIFT Workstation in WSL, which bypasses Windows NTFS access controls. Arsenal Image Mounter is a free alternative that handles permission issues more gracefully than FTK Imager’s mounting.
Learn about all FTK Imager capabilities in our features overview.
Still have questions? Visit the getting started guide or check the download section for the latest version.